
Import vineyards
Instead of creating every vineyard individually, you can import your vineyard data from external agricultural management systems. The import brings across both master data (name, grape variety, area) and area geometries, provided these are included in the source file.
Supported import sources
Section titled “Supported import sources”Vinitor supports import from the following systems:
| Import source | Region |
|---|---|
| eAMA | Austria |
| FIONA | Baden-Württemberg, Germany |
| LAFIS | South Tyrol, Italy |
| LEA | Rhineland-Palatinate, Germany |
| LAWIS+ | Switzerland |
Export guides
Section titled “Export guides”For each supported system there is a detailed step-by-step guide to exporting your data:
Import wizard
Section titled “Import wizard”The import runs through a three-step wizard:
At the bottom of the wizard you can see where you are at any time — e.g. Step 2 of 3. Use Back on the left to go back a step at any point.
Step 1: Upload file
Section titled “Step 1: Upload file”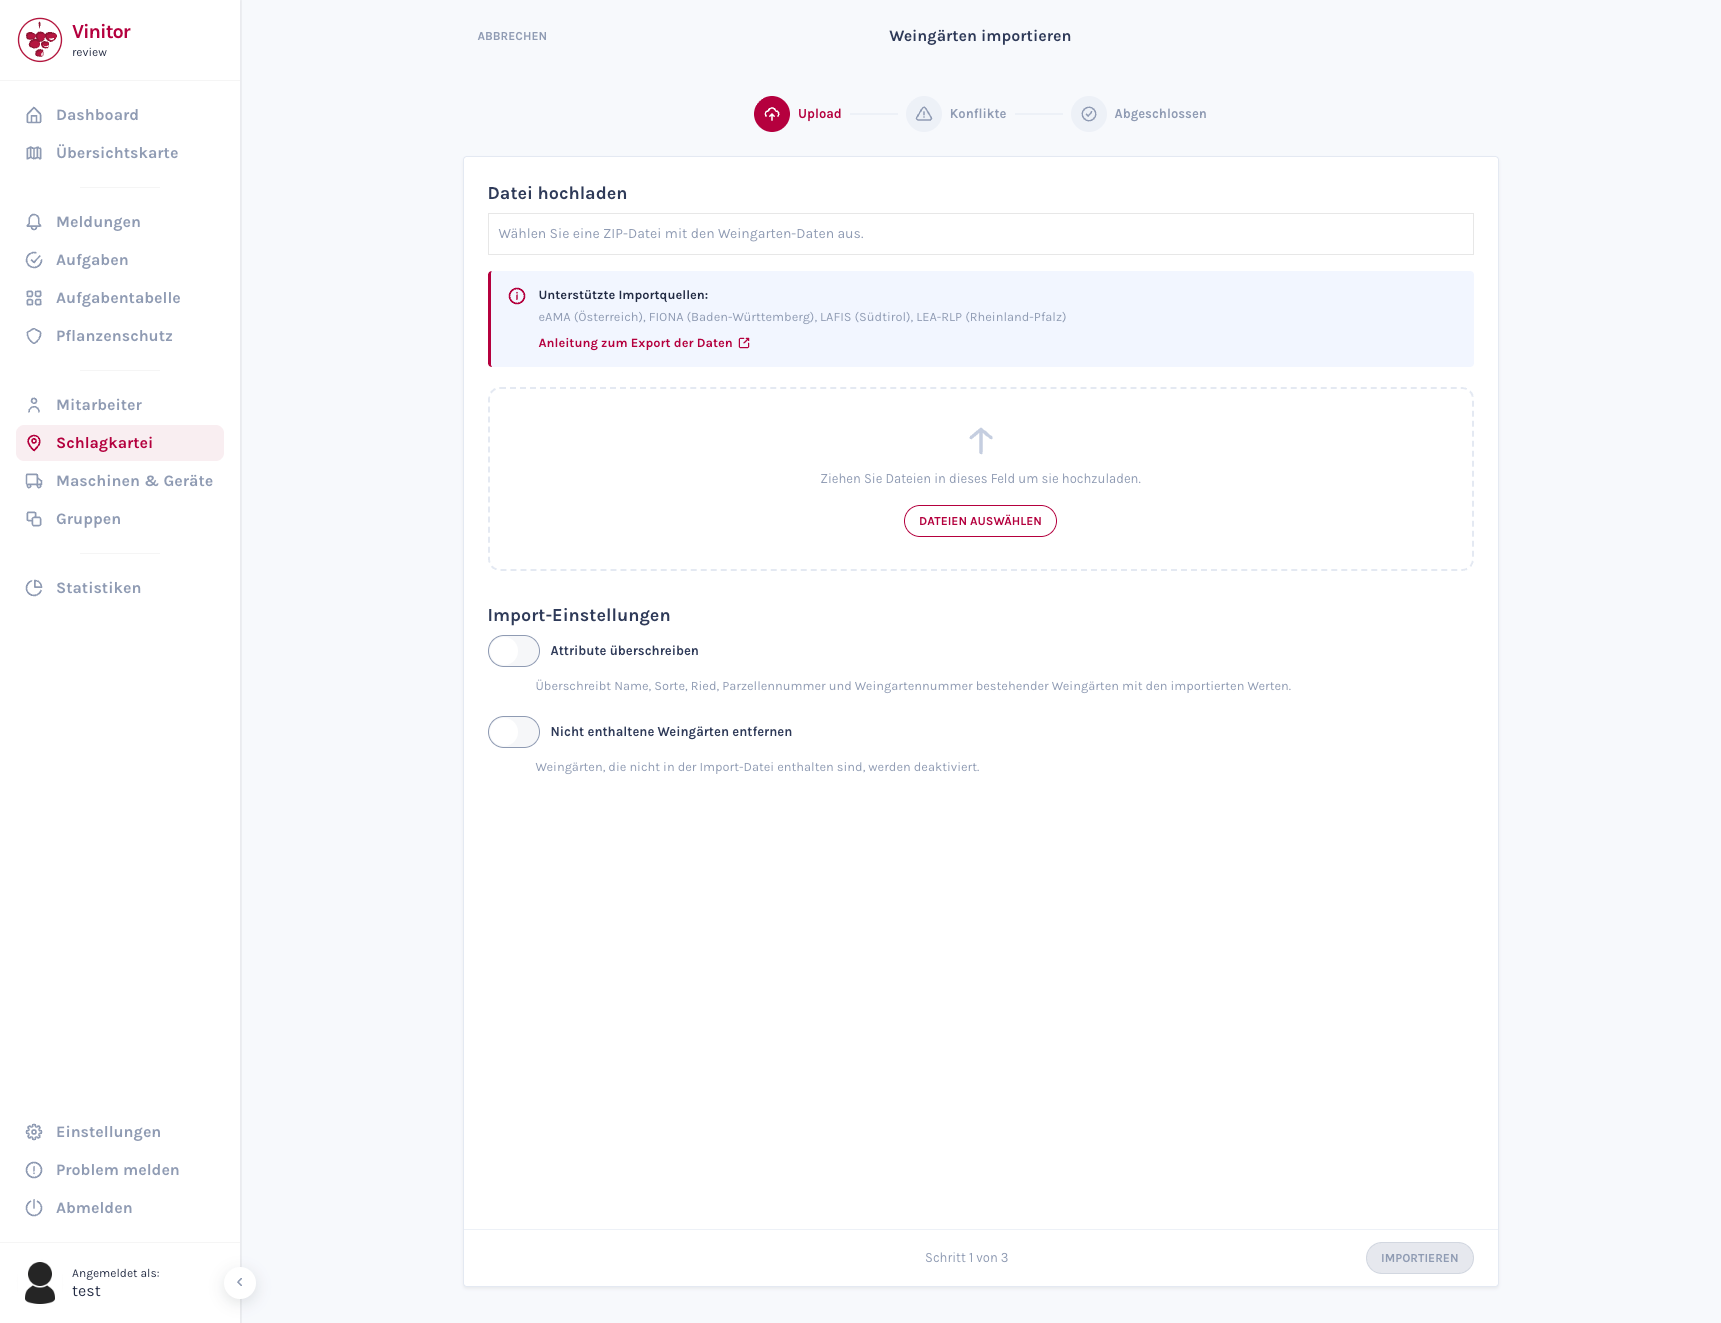
-
Navigate to Field record book in the sidebar.
-
Click Import in the top right.
-
Under Import source, select the system your data comes from (e.g. eAMA, FIONA).
-
Upload your file by dragging and dropping it into the upload area, or by clicking to select a file.
-
Configure the import settings (see below).
-
Click Import in the bottom right.
Once you have chosen an import source, a Guide: … link appears below it — it takes you straight to the matching export guide on this documentation site. A guide is available for all five import sources.
Import settings
Section titled “Import settings”Before importing, you can enable two options via checkbox:
| Option | Description |
|---|---|
| Overwrite attributes | Overwrites the name, variety, Ried, parcel number and vineyard number of existing vineyards with the imported values. |
| Remove vineyards not included | Vineyards not included in the import file are deactivated (not deleted). |
Step 2: Resolve conflicts
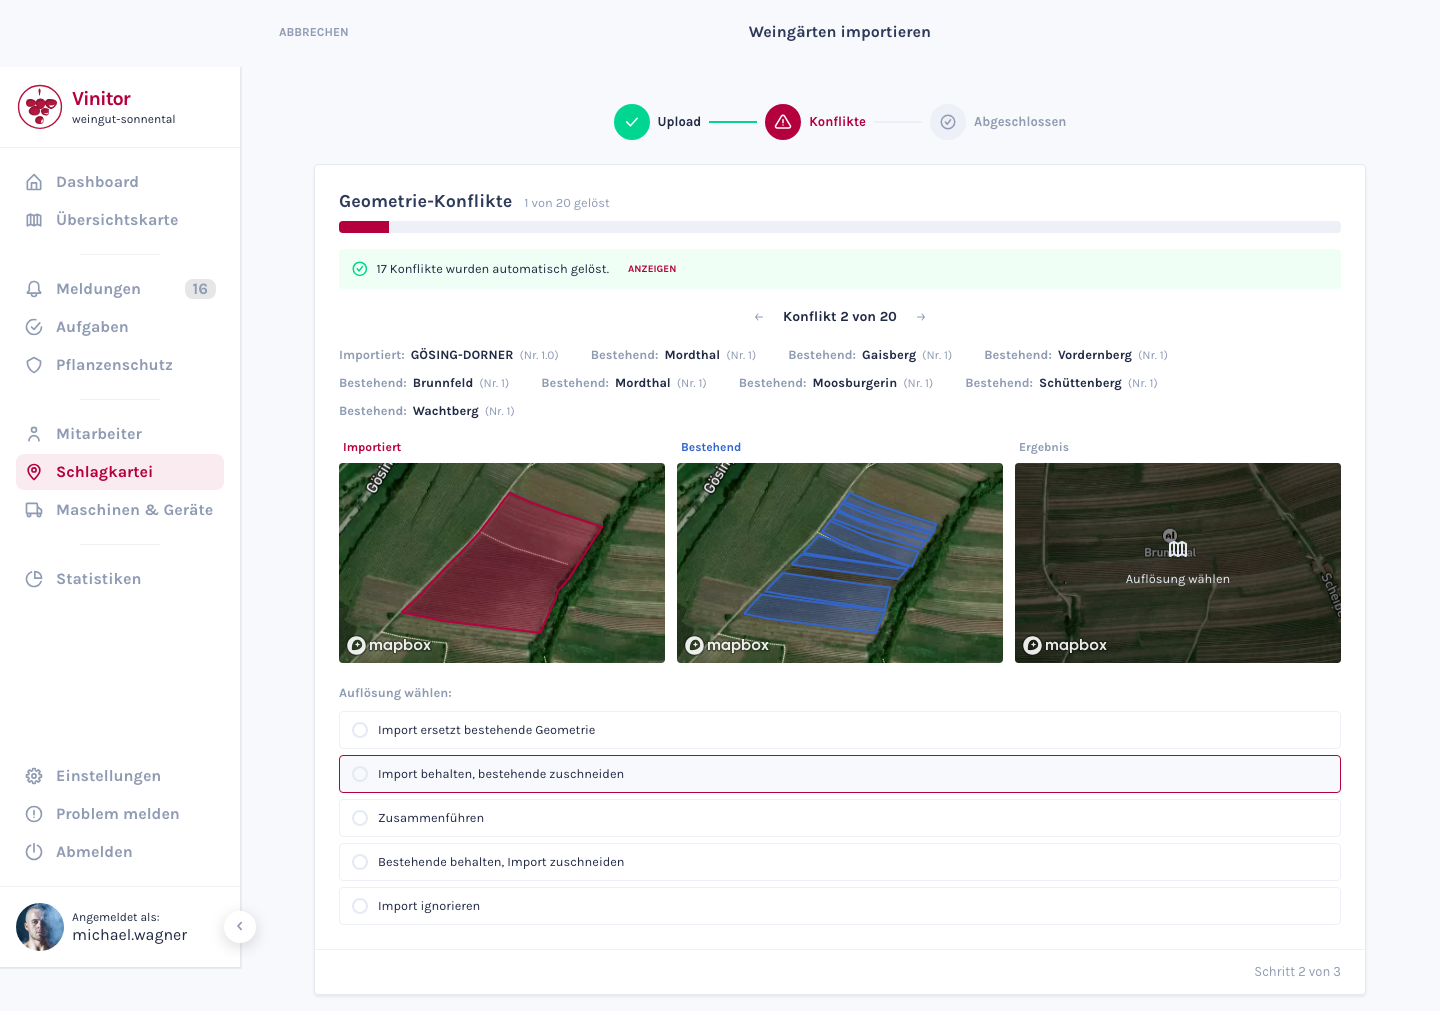
Section titled “Step 2: Resolve conflicts”If an imported area overlaps an existing one, Vinitor puts this geometry conflict to you for a decision. You work through the conflicts one after another — one view per conflict.
Genuine overlaps only
Section titled “Genuine overlaps only”Register data is drawn edge-to-edge: neighbouring parcels touch one another. A shared boundary alone is not a conflict, though. Vinitor therefore only presents an overlap to you if it covers at least 2 % of the existing area or at least 2 % of the imported area. Anything below that — adjoining neighbours, tiny drawing inaccuracies — is ignored, and the imported vineyard is created as normal.
That reduces the number of decisions considerably and makes resolution safe: a single import used to pull its genuine matches and two or three merely adjoining neighbours into the same conflict — so anyone choosing Import replaces existing geometry deactivated the neighbours along with it.
The progress bar
Section titled “The progress bar”At the top, a bar shows progress across all conflicts in this import — green for what has already been resolved, red for the rest, and next to it the counter 3 of 7 resolved. Automatically resolved conflicts count towards it; a note underneath gives their number (”… conflicts were resolved automatically.”). So you start with a head start and immediately see how much is genuinely left to do.
The three maps
Section titled “The three maps”The conflict is shown on three maps side by side. All three show the same map viewport, so that you can compare the areas position by position:
| Map | Content |
|---|---|
| Imported | The newly read-in area (red). Behind it lie the existing vineyards as grey dashed outlines — so you see the overlap in question directly on the map. |
| Existing | The affected existing vineyards (blue), numbered from 1 upwards. The number sits as a marker inside the area. |
| Result | Preview: this is what the area looks like if you apply the currently selected resolution. |
Below each map are the names of the vineyards it draws — each with its number and area. Hover over an entry (or move to it with the keyboard) and the corresponding area is highlighted on the map while the others recede. That way you find the right vineyard immediately, even when several are involved.
Choose a resolution
Section titled “Choose a resolution”Under Choose resolution: you decide what should happen to the overlap:
| Resolution | Result |
|---|---|
| Import replaces existing geometry | The imported area completely replaces the existing one. |
| Keep import, clip existing | The imported area stays unchanged; the existing one is clipped by the overlapping part. |
| Merge | Both areas are merged into one. |
| Keep existing, clip import | The existing area stays unchanged; the imported one is clipped. |
| Ignore import | The imported area is discarded, the existing one stays as it is. |
Your choice takes effect on the Result map immediately — you see the consequence before moving on.
Moving on is your decision
Section titled “Moving on is your decision”Choosing a resolution does not page forward automatically. You can study the effect on the Result map at your leisure and then move on yourself:
- Next / Back at the bottom right and left — or the arrow keys ← and →.
- As long as the current conflict has no resolution, Next is disabled and the hint Choose resolution appears. Skipping is therefore not possible.
- You can also review conflicts that were resolved automatically using Back, and decide differently if needed.
- Only once every conflict has a resolution does the Resolve conflicts button appear on the last one. That click — and only that click — starts the processing.
Step 3: Complete
Section titled “Step 3: Complete”Once processing has finished successfully, the wizard displays a summary. Use To the vineyard list to return to the field record book. Your imported vineyards now appear there — including map geometries, provided these were included in the source file.
After the import
Section titled “After the import”After a successful import, we recommend:
- Check master data — Spot-check that the name, grape variety and area were transferred correctly.
- Check map geometries — Open a few vineyards in the detail view and check that the drawn areas are displayed correctly.
- Add leaf wall height and row spacing — Most import sources don’t supply these fields, but they’re required for the plant protection calculation. Use bulk editing in the field record book to enter these values efficiently for all vineyards.
- Assign groups — Organise your imported vineyards into groups to structure them logically.
SUPPORT
Need help?
Our team is happy to help with any questions about Vinitor.